
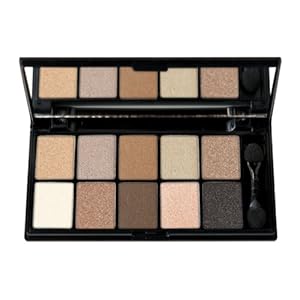
This is from NYX, it's called Champagne and bubbles now, but when I bought it, it was called Caviar and bubbles. Or champagne and caviar or somethings like that haha! I can't remember now.
So I love this pallete so much I wore it on my wedding day!

My sister wanted to learn how to use this pallete so I thought I'd show a few looks you can do in the next few weeks. I would have done this as a video, but I didn't have the time! If you like makeup tutorials, I can make sure to make more!
So here we go! For this look, which I wear on a pretty regular basis...

Step number one, apply a grayish brown color to the whole lower lid. If you are using the NYX pallete, it is the second color in from the left, on the top row.

Next, apply a darker brown color to the outer corners of your eyes (color immediately below first color in NYX pallete). Eyes appear bigger when darker colors are used on the outside corners.


If you remember this idea, most other makeup applications can be done fairly easily and without mistakes. The rule of three really helps to. The first color is for your inner corners, and should be the lightest. Second is medium color and used for the middle of the eye. The third is the darkest color and is used on the outside corners!
The third step is to line your lower lash line with the darker brown color.

This part is important because even though we are going to be using eyeliner, we want a smoky look. If we just used the eyeliner it would look more harsh and not placed well. Guys, forgive my eyebrow, it's the bain of my existence.
So this is what we've got so far, after brown eyeliner on the top and bottom lids.

Next, we want to define this makeup a little bit more. If you don't wear a lot of makeup you might be shy to use black eyeshadow. It is worth it if used wisely. I don't like the idea of raccoon eyes, but black shadow is beautiful!

This next photo will show where I place the black shadow (also used from the NYX pallete). Look at the eye on the left...

So this is the finished eye shadow placement, now we just need a coat (or 4 teehee) of black masacara, and some lips!

I think it's quite appropriate for all occasions, and can be worn very well from day to night. If you want a more dramatic finish, I'd add more black during that step, and also black kohl eyeliner instead of brown. This also looks great with different lip colors. Also, If you are into a vintage look, this is it! Just add some black eyeliner wings to your eyelids outer corners, and red lippies!
TADA! Any questions class? How do you like makeup tutorials? Should I do more?
5 comments:
Absolutely gorgeous! Oh, so is the eye shadow. I'll have to find this palette!
I'm glad you liked it! I buy my nyx products on their website, but I have heard that they sell it in drug stores in some states!
I need that pallete! oh my gosh! I love love loveeeeee natural colors, it's pretty much all I wear, though I have lots of shades...I just like neutrals better. You are great at that btw, I am terrible at putting on makeup. ugh
I am actually 100% allergic to makeup. It doesn't matter if it's the special kind. If I put anything on my face for longer than an hour or two, I start breaking out in hives. So I learned, long ago, to never do anything with makeup. The last time I wore makeup was at my sister's wedding four years ago. They used special kind and it was in a salon in Palestine (Israel) so they did Middle-Eastern style makeup on me. It was awesome. I washed it off as soon as I could, haha! :D
Pretty!!
Post a Comment